

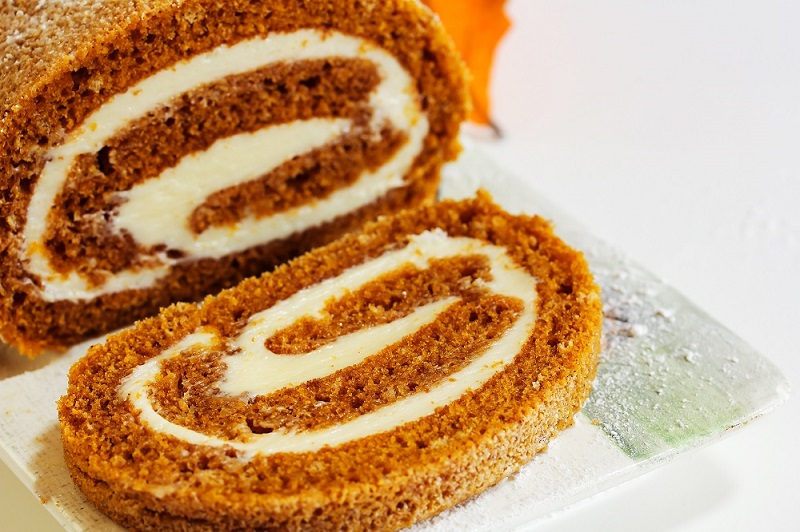
She’s crisp, but smooth and extremely (extremely!) aromatic– she’s a pumpkin sourdough bread, with a cinnamon sugar swirl.
Pumpkin Sourdough Bread ?
with a sugar cinnamon swirl!
A must-make sourdough loaf if cozy vibes is what you’re after.
And since she’s veeery frivolously sweetened with honey, she’s a very good loaf for each candy and savory parings alike– assume a basic apple butter breakfast toast to 1 heck of a grilled cheese with smoked gouda and sage butter ?.
my high tip: hand around in the kitchen whereas your loaf is baking for the total sensory expertise (and add in a scorching toddy for further measure).
laminating the cinnamon swirl
Your dough ought to have at the least doubled in dimension after the primary fermentation as a way to laminate it with the cinnamon sugar and form it (however I personally are inclined to push it in direction of tripling in dimension, as I benefit from the intestine pleasant advantages of barely over-proofed doughs: much less gluten and carbs imply a softer and simpler to digest crumb).
Simply be aware that I’ve at all times observed a slower gluten improvement in all my sourdough loafs with pumpkin puree (say the dough is shaggier and extra fragile through the stretch and folds). Fear not, the loafs nonetheless end up splendid– simply make sure you’re utilizing a robust bread flour (although subbing one thing like 10% rye can be a fab concept if that’s your factor).

1. laminate the dough
Stretch your dough on a really frivolously floured countertop (in the event you really feel it resisting simply let it relaxation for fifteen minutes)(and also you’ll undoubtedly know if its resisting). Sprinkle a beneficiant quantity of cinnamon sugar– you are able to do simply cinnamon (or, sure, pumpkin spice), however I personally loved the contact of sweetness.

2. fold it

3. fold it (once more)

4. sprinkle a contact extra cinnamon (‘roll it up!)
That is the stage the place you roll up your loaf as tightly as you may (with as little flour as you can also) as a way to create rigidity in your dough, which is what results in the holy grail of a sourdough crust: one that’s crisp and bubbly.
As soon as formed, switch to a (very properly floured) banneton and proof within the fridge* for at the least 6 hours (max 24 because the honey and pumpkin enhance the fermentation exponentially).
*sure, you may proof at room temp too– however do be aware that this dough is way simpler to attain and deal with as soon as chilled (i.e. you actually would possibly discover it not possible to attain cleanly with out chilling it for at the least one hour).

5. form it (‘n bake it)
And final, however not least, it’d simply be obligatory to form it like an precise pumpkin. It’s simple (fear not!), all you want is a few bakers twine (giving it a very good rub with oil is at all times a good suggestion to make sure it doesn’t completely embed into your loaf).
p.s. I made slightly video tutorial for this half, be at liberty to observe the little video story beneath ?
xo! Paola

the video story ?


Pumpkin Sourdough Bread (with a cinnamon swirl!) ?
She’s crisp, but smooth and extremely (extremely!) aromatic– she’s a pumpkin sourdough bread, with a cinnamon sugar swirl.
for the cinnamon sugar swirl
2 tablespoons cinnamon1/4 cup sugar non-compulsory
feed your starter
Add roughly 50g of flour to feed your starter (you need 100g of energetic starter for the recipe, so it relies on how huge you retain your starter (say you could wish to feed it for a pair days with out discarding in the event you maintain a small one going)(or in the event you’re taking yours out of the fridge you’ll def must do one feeding earlier than it’s robust sufficient to bake with).
Add sufficient spring water (you don’t need filtered, you actually do need the added minerals) till the dough resembles a thick pancake batter. Typically 50g of water/50 g of flour (i.e. a 100% ratio) is sufficient to get the consistency proper (however in the event you’re coping with hotter temperatures you could wish to do exactly 70% to have a extra secure starter).
Permit to relaxation for 3-6 hours in a heat(ish) place: till it doubles in dimension. You may check for prime exercise pretty properly both utilizing the float check (because it sounds: test in case your starter floats in slightly water) or the burn check (faucet your starter on the counter to “break the floor”, mild a match and if it blows out it means your starter is utilizing up all of the oxygen within the surrounding space i.e. it’s sourdough time).
3-6 hours later: make your dough
Add the water (ideally at room temp), pumpkin puree, energetic starter and honey to a big bowl. Utilizing your arms (although some peeps favor a danish hook) combine till completely dissolved.
Add within the flour and salt and blend together with your arms till simply mixed and the dough is all shaggy (and sticky).
Cowl with a kitchen towel and let it relaxation for half-hour.
30 minutes later: bulk rise (plus stretch ‘n folds)
Repeat three extra instances each thirty minutes (sourdough pumpkin baked items take slightly longer to develop gluten, so its necessary to do just a few units!).
Switch to a smaller bowl (because it’s simpler to gauge the rise in the event you can truly mark it with a sharpie) and canopy with a kitchen towel.
Permit to relaxation for 3-10 hours, or till at the least doubled in dimension (do not forget that time right here is straight influenced by temperature so it’ll range tremendously)(p.s. I usually let mine go till it virtually tripes as I’ve pushed it simply till the purpose that it begins to recede again and it nonetheless comes out excellent)(and I personally discover it best to digest).
4-8 hours later: form
See publish for steering! Calmly flour your working floor, flip the dough out and stretch it out gently (enable it to relaxation for 10 minutes if it “feels” prefer it’s resisting)(you’ll know, belief me!). Stretch it out, sprinkle with cinnamon sugar, fold the perimeters in, and roll it gently however tightly. You then wish to roll it gently in opposition to the counter in direction of you just a few instances (this creates floor rigidity, making for a greater crust!).
2 hours later: bake away!
Preheat oven to 450°F/230°C together with your Dutch oven inside for 20 minutes (some peeps bake at a decrease temperature, say 420°F, it relies upon a bit in your oven).
Wrap loaf with bakers twine and rating it (please see video story for slightly tutorial).
Bake lid on for 20 minutes, take away lid and bake for 20 extra minutes or till deeply golden brown (in the event you faucet it on the underside it’ll additionally sound hole).


